
There is a specific kind of magic that happens the moment a preschooler drops a spoonful of baking soda into a splash of vinegar. The immediate, audible, and visual “fizz” is more than just a fun experiment; it is an entry point into the world of scientific inquiry.
For parents and teachers, baking soda is the ultimate classroom staple. It is safe, inexpensive, and incredibly forgiving. These activities turn a regular afternoon into a laboratory, allowing young children to practice observation, hypothesis testing, and the foundational language of science—all while making a joyful mess.
The Science Behind the Fizz
When you combine baking soda (a base) with vinegar (an acid), you trigger a chemical reaction. The result is the production of carbon dioxide gas—the same gas we exhale and that creates the bubbles in soda.
For a preschooler, you don’t need to explain molecular bonds. Instead, focus on the observation:
- The Reaction: “Look at those bubbles! That’s gas being made!”
- The Transformation: “We started with a solid powder and a liquid, and now we have bubbles. That’s a change!”
The goal isn’t for the child to memorize the chemical formula; it’s to build a “scientific mindset”—a sense of curiosity where the child learns to ask, “What happens if I try this?”
8 Essential Baking Soda Experiments
1. The Classic Erupting Volcano
- What You Need: A plastic cup or small bottle, baking soda, vinegar, red food coloring, a tray.
- How to Do It: Place the cup in the center of the tray (build a ‘mountain’ of playdough around it if you like). Fill the cup halfway with baking soda and a drop of red dye. Pour in the vinegar and watch it erupt!
- Talk About It: “Why is it flowing down the sides? Does it look like real lava?”
2. Baking Soda “Paint” Reveal
- What You Need: Baking soda mixed with a little water to make a paste, food coloring, muffin tin, vinegar in a spray bottle.
- How to Do It: Paint different colors onto a paper or tray using the baking soda paste. Once it’s dry-ish, spray it with vinegar.
- Talk About It: “What color is appearing as the paint fizzes away? Did the colors mix together?”
3. Hidden Treasure Rocks
- What You Need: Baking soda, water, small plastic toys (beads/dinosaurs), food coloring.
- How to Do It: Mix baking soda with a tiny bit of water and food coloring to create a moldable dough. Wrap the dough around the toys and let them dry into “rocks.” Give the child a dropper of vinegar to “excavate” the treasure.
- Talk About It: “Can you see a clue inside the rock? What do you think is hiding in there?”
4. Frozen Fizzing Blocks
- What You Need: Baking soda, water, food coloring, ice cube tray, vinegar.
- How to Do It: Mix water, baking soda, and dye; pour into ice trays and freeze. Pop the frozen blocks out onto a tray and let the child drip vinegar over them.
- Talk About It: “How long does it take for the ice to melt and the fizz to start? Does it fizz faster if the block is smaller?”
5. Fizzing Hearts or Shapes
- What You Need: Cookie cutters, baking soda paste (same as above), vinegar, dropper.
- How to Do It: Use the cookie cutters to shape your baking soda paste into hearts or stars on a tray. Let them dry, then let the kids drip vinegar over the shapes.
- Talk About It: “What shape is dissolving the fastest? Can you make the whole shape disappear?”
6. Erupting Lemon/Orange
- What You Need: A halved lemon or orange, baking soda, craft stick, food coloring.
- How to Do It: Scoop out the center of the citrus, add food coloring, and pour in baking soda. Use the craft stick to stir the center and watch it bubble up.
- Talk About It: “Does it smell different than the vinegar volcano? Why do you think the fruit is making it fizz?”
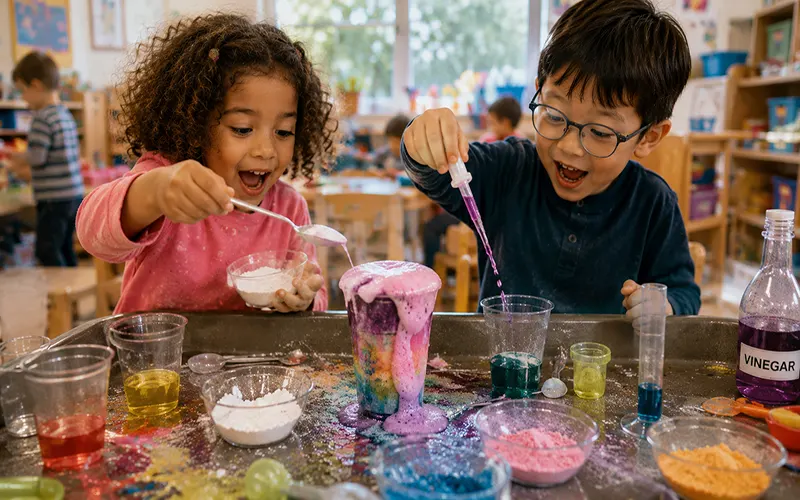
7. Rainbow Fizz Tray
- What You Need: Baking soda, liquid watercolors or food coloring, vinegar, multiple droppers or small cups.
- How to Do It: Spread a thick layer of baking soda on a large tray. Drip different colors of vinegar in different spots.
- Talk About It: “What happens when the blue vinegar meets the yellow vinegar? Did you make a new color?”
8. Fizzing “Magic” Potion
- What You Need: A large bowl, baking soda, vinegar, glitter, plastic spoons, sequins.
- How to Do It: Fill the bowl with baking soda and add glitter/sequins. Let the children stir in vinegar to create a “magic” bubbling potion.
- Talk About It: “How much vinegar do we need to make the glitter dance? Is the potion getting bigger or smaller?”
Safety & Success Tips
- Contain the Mess: Always perform these experiments on a large, rimmed baking sheet or in a sensory bin.
- Respect the Fear: Some children are startled by the sudden fizzing noise. If a child is hesitant, let them use a dropper to initiate the reaction slowly rather than pouring the whole bottle at once.
- Materials Matter: Use small plastic droppers or “baster” tools. These help children focus on the fine motor skill of controlling the chemical reaction rather than just dumping it all out in one second.
Fostering a Scientific Mindset
Science in the preschool years isn’t about getting the “right” answer; it’s about asking the right questions. When you present these experiments, you are teaching your child that the world is worth investigating. Whether they are excavating a plastic dinosaur or creating a rainbow of bubbles, they are learning how to observe changes, test their ideas, and find wonder in the everyday. Keep it simple, keep it messy, and keep asking, “What do you think will happen next?”


